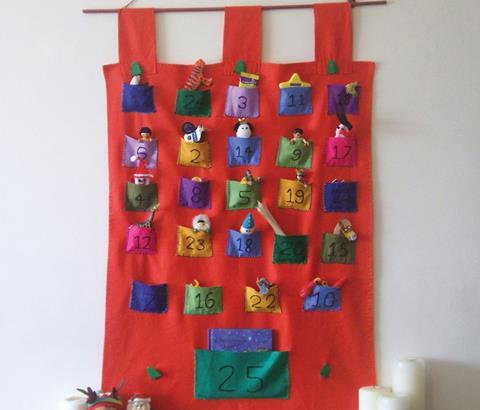
Create an Advent calendar
Sian Lawton shows you how
You will need:
• A large piece of felt measuring at least 16" x 22" (406mm x 559mm)
• Assorted colours of felt
• Needle
• Decorative buttons
• Embroidery thread in black and other assorted colours
• Scissors
• Fabric pen or fine liner
• Pins
• Dowel to hang it on
Step 1
Begin by cutting the large piece of felt to size (16" x 22"/406mm x 559mm) and then sew a very small running stitch about ¼" (6mm) inside of the edge all the way around.
Step 2
Take the other pieces of felt and cut out 24 pieces in varying colours, each measuring 4 ¼" x 4" (108mm x 102mm). Then, cut out one larger piece measuring 10" x 6" (254mm x 152mm). Write the numbers 1-24 on the smaller pieces and the number 25 on the larger piece in a fine line pen or a fabric marking pen, and then embroider the numbers in chain stitch, using the black embroidery thread.
Step 3
Once you have embroidered the numbers onto the pieces of felt, lay the small pieces out on the large piece of felt. You can arrange the pieces in numerical order or you can mix them up a bit so that you have to hunt for the next day’s number. The large “25” rectangle needs to go at the bottom of the felt, as this is an extra pocket for a bigger present for Christmas Day.
Step 4
Once you are happy with your layout, pin the felt pieces in place and thread your needle with different colour cotton from the felt. Attach each pocket to the backing felt using blanket stitch.
Step 5
When all the pockets are sewn in place, it’s time to put the tab tops onto the top of the main body of the felt. You need to cut three rectangles measuring approximately 14" x 5" (356mm x 127mm) from either the same colour as the backing felt or a mixture of the felt colours you have used for the pockets. Attach the tab tops to the felt, making sure that they are equally spaced across the width. These will form loops to be able to thread a dowel through to hang the calendar up. Fold the rectangle over and place each side over the main fabric so that you have about 1" (25mm) of fabric sandwiched in-between the loop. Then use a small running stitch to attach the tab to the background and sew in a rectangle. You can also sew a very small running stitch on to the sides of the tab to match the running stitch around the outside of the calendar. Then sew the decorative buttons on each tab.
Step 6
You can now thread the dowel through the tabs. Make a twisted cord out of some embroidery threads, so that you can hang the calendar up.
Step 7
Once the calendar has been completed, it’s time to start collecting your goodies to go into each pocket. You could also write or print out small sections of the Christmas story to add to each pocket. Why not theme it so that if you are telling a section of the story that involves the shepherds, you include a sheep eraser or for the kings you could include a paper crown.


